CS 161 Lab #9

March 28th

Goals:

This week we'll take a break from loops, conditionals, and arrays, and focus on testing our code. Our programs are getting complex enough that we need to be spending more time verifying that they work as intended. As discussed in class, it makes sense to create a series of small-scale tests, each of which focuses on one particular aspect of a class's behavior, and to write actual Java code to perform the tests rather than just stepping through the tests "manually" (via BlueJ's point-and-click interface or the codepad). Keeping the tests small means that if problems are identified we'll have a very specific issue to fix. Implementing the tests as runnable Java code means that we can re-run the tests quickly and easily — for example, to re-test code after we make changes or fix bugs.

Directions:

We will create JUnit tests to verify that the book's Clock Display project works properly. When you're all done, the finished product will look like this, where the green boxes are the classes holding the testing code — one for each of the classes in the Clock Display project:
  1. Download the ClockTestingLab project and extract its contents, then start BlueJ and open the project. Take a look at the code in the two classes to remind yourself what's there and how it works.
  2. Before you can use BlueJ's "recording" facilities to help build tests, you'll need to turn on the testing features: Use the View menu and make sure the "Show Team and Test Controls" item is checked. If all goes well, the project window should now have a "Run Tests" button below the "Compile" button (see above).
  3. Since the ClockDisplay class builds off of the NumberDisplay class, it makes sense to test NumberDisplay first. (If NumberDisplay isn't working properly, then we wouldn't expect ClockDisplay to work either.) Create a testing class by right-clicking on NumberDisplay and selecting "Create Test Class" off of the menu that pops up. You should end up with a green class icon NumberDisplay. You can double-click on the new class to see what's there. BlueJ created a framework for our testing code, but it doesn't contain any actual tests yet.
  4. Look at the source code for NumberDisplay for a moment, and think about how you'd test each of the methods. (Do it. I'll wait.) Before creating any JUnit test methods, let's manually test the constructor the "old fashioned" way: We'd expect that when a NumberDisplay object is created, its value is set to zero. Test this by right-clicking on NumberDisplay to create an instance of the class, then right-clicking on the NumberDisplay object and calling its getValue() method. It ought to return 0.
  5. Now let's repeat that simple test, but build it into a JUnit test method. This time, instead of right-clicking on NumberDisplay, right-click on NumberDisplayTest (the green box behind NumberDisplay) and select "Create Test Method...". When prompted for a name, use 
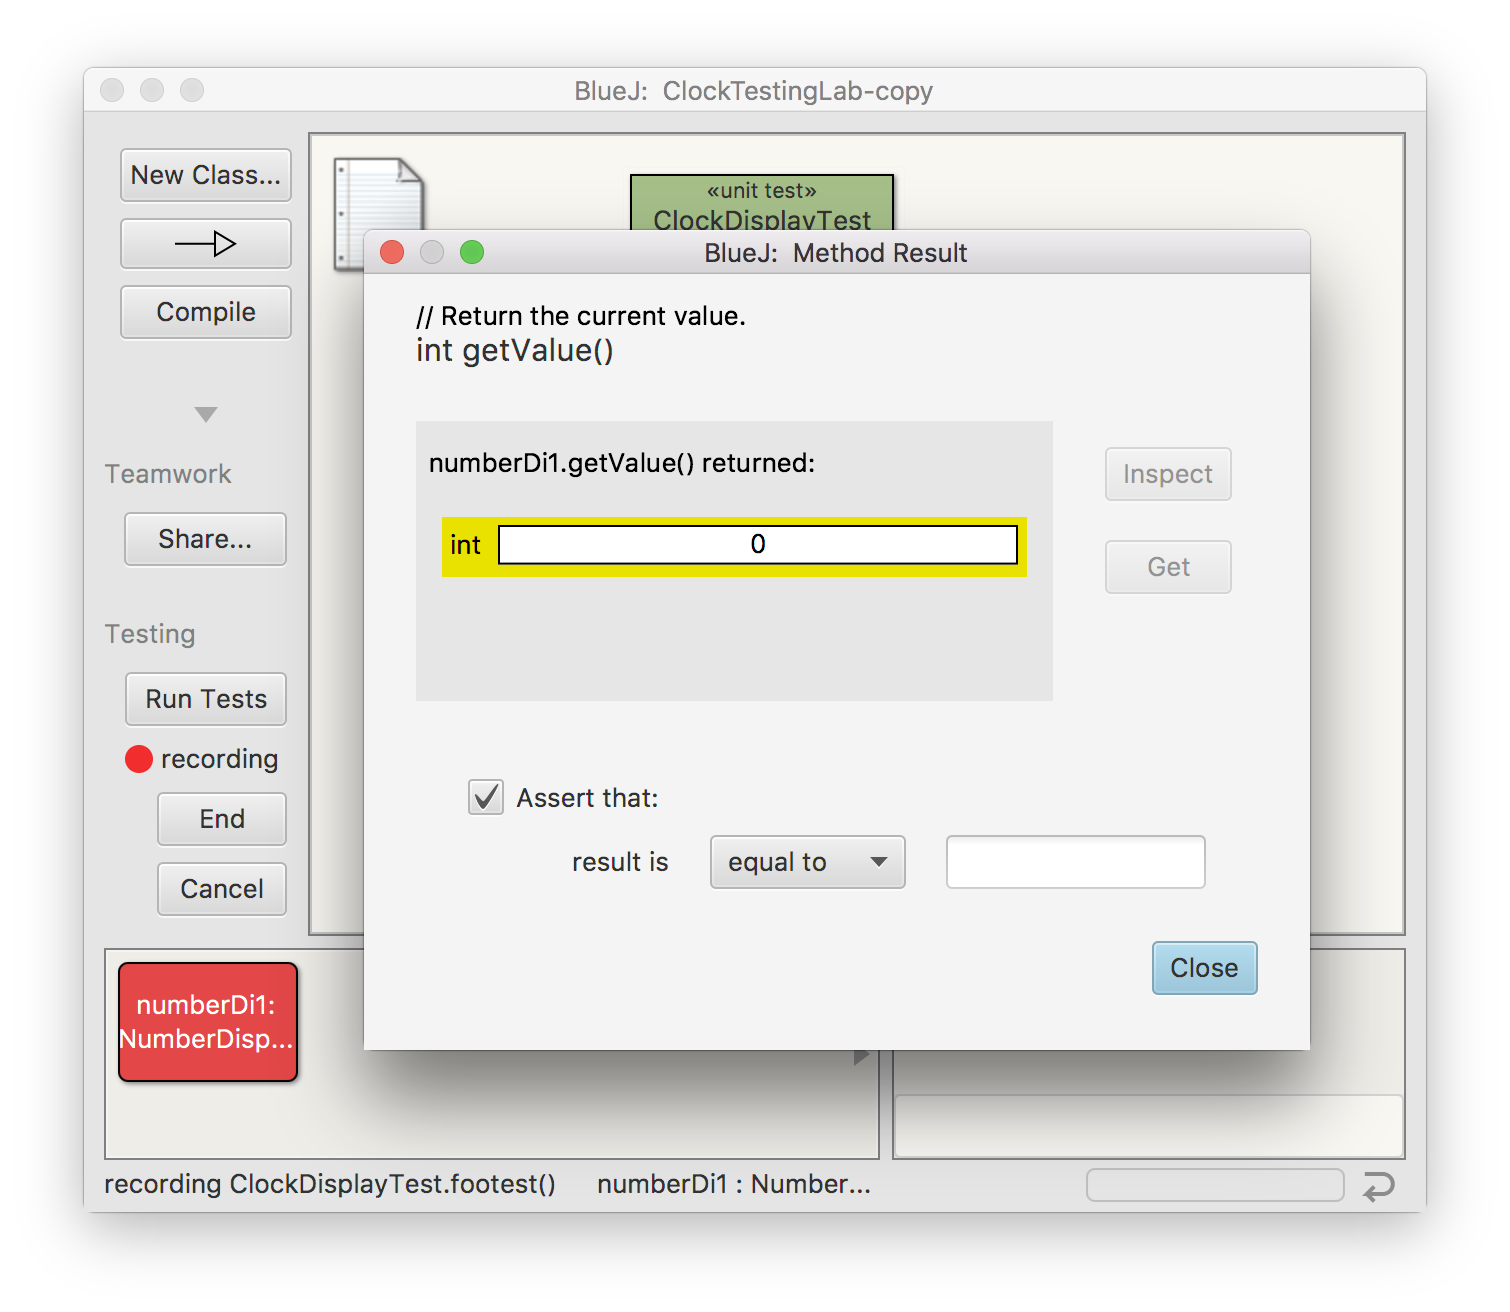
constructor_InitiallyZero. (We're testing the constructor, and ensuring that the value is initially zero, and the name will remind us of that.) The red "recording light" should be on, which means BlueJ will watch everything you do from this point onward, whether it's in the codepad or pointing-and-clicking, and build it in to the test.

    Go ahead and repeat the test process: Create a NumberDisplay object, then call getValue on it. This time around, the resulting box looks a little different. BlueJ says the method has returned a zero, but it wants to know if it should always expect a zero there (and complain if it's not). Make sure the "Assert that" box is checked, enter a 0 in the box, then click Close. That's the end of this test, so click the "End" button under the recording indicator. Now if you look in the NumberDisplayTest class you'll see the new method at the bottom of the code. After compiling, you can right-click on the NumberDisplayTest class and "Test All" to run the new test, or click the "Run Tests" button on the left edge of the project window.

  6. One test down, a bunch more to go... Let's continue writing tests, keeping them short and simple. For each of the tests below, follow the same steps as before: Right-click and "Create Test Method...", point-and-click your way through a test, then stop the recording. If you make a mistake while recording, you can either stop the recording and delete the botched test code, or keep going and then edit the automatically created code to fix the mistake. Create the following test methods:

    Make sure all of these tests run successfully before proceeding.

  7. Whew! That was a lot of tests. Now that we know that NumberDisplay is working properly, let's write some tests for ClockDisplay. Right-click on ClockDisplay to create a test class, then right-click on the new test class to add the following tests:
  8. Now let's make some changes to the original code that introduce bugs, and see if our tests can find them. Try the following, one at a time, running all of the unit tests after each change. If none of your tests catch the bug you've introduced, think about why, and how you'd adjust your tests to get better coverage. Undo each bug before trying another:

Extras

If you finish early and want additional challenges, consider the following:


Brad Richards, 2024