CS 161 Lab #2
January 25th
Goals:
We've got two main tasks to get through this week: First you'll practice with some assignment statements and learn more about variables and scope, and finally we'll wrap up by writing code that draws a picture in much the same way the "house" project does. (Note that the house project is online for you to look at for inspiration — see the House class in particular.) If you don't finish during lab period, I'd recommend that you try to finish this lab later for practice.
Partners
In each lab this semester you will work with a randomly assigned partner. (I'll have Zoom randomly set up breakout rooms.) Please be kind in your interactions with your partners! Keep in mind that students in this class have a range of previous programming experience, and that some have been college students for longer than others. We're all in this together, and you have something to learn from your partner, no matter who they are or what their previous experiences have been. I expect that group members will collaborate and work together on each step of the lab.
Getting Started
-
Take a moment to introduce yourself to your partner(s). After social pleasantries are complete, pick one member of the team to be the "typer". They'll share their screen while editing the lab code in BlueJ. Group members should contribute equally while working through the problems below and discuss all code to be written, though only the "typer" will be able to edit code. Resist the temptation to have both members work simultaneously in BlueJ — you're much more likely to "drift apart" over the course of the lab if you do so. The goal here is to have a partner who's engaged on exactly the same step of the lab as you are.
Consider letting the less experienced member of the group do the typing if it seems like there's a mismatch in experience or comfort levels. That will help make sure they don't get left behind. Worst case, flip a coin to see who does the typing. Or have Java generate a random boolean value. (Type (new java.util.Random()).nextBoolean() in the codepad.)
At the conclusion of the lab, make arrangements for the typer to share a copy of the code with the other member(s) of the group if desired. (E.g. email it, or put it on a shared Google drive, etc.) My solutions to the lab will get posted as well.
-
Have the "typer" download the PacMan_Lab project on their machine. Extract its contents like you did on the first lab, then either double-click on the
package.bluej file inside the project folder to open the project in BlueJ, or start BlueJ and use the Open menu item to select the project folder.
Changing State via Assignment Statements
You'll work as a team throughout the rest of the lab. That means you'll both be looking at the shared screen in Zoom and discussing the steps below as you go. Recall that Java's assignment statement is used to store values into variables. It has the following form:
variableName = value;
where variableName is the name of a variable (instance variable or other) that you want to change, and value is an expression describing the new value to be stored in the variable. The expression on the right-hand side can be a literal value like 100, or involve the name of another variable. If it's a variable, you're telling Java to look inside that variable, retrieve its value, and store that value in the variable on the left-hand side. One good way to get practice with the assignment statement is to read existing code that uses assignment statements, and see if you can predict their results.
-
Double-click the
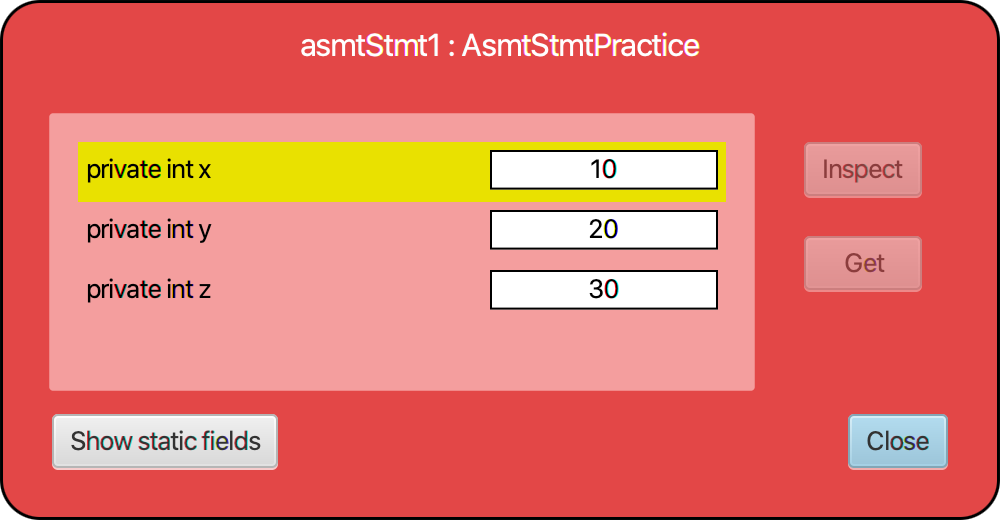
AsmtStmtPractice class and spend a minute familiarizing yourself with its contents. Instances of the class each have three fields — x, y, and z. The constructor calls another method, reset, to give the fields initial values. (It was set up that way so that you could call reset yourself to get back to those initial values at any time.) Create an instance of the class (right click on it and select the first item on the menu that pops up), then double-click the object (the red rounded rectangle) to open an object inspector before proceeding:
-
There are seven "test" methods in the class. For each, do the following: read the assignment statements in the body of the method and discuss with your partner how you think they'll modify the variables. Try to predict the values in
x, y, and z at the end of the method after the assignment statements have been executed. Once your team has come to consensus on your prediction, test it by running the method and using the object inspector to peek at the final values. Call reset on the object before moving on to the next test method. If the behavior of any of the cases seems unexpected, feel free to ask for more information.
Variables and Scope
The scope of a variable is the region of the Java program in which it can be accessed (assigned to, or used as a value). A variable declared inside a method is called a local variable and can only be accessed by the statements within that method. (We'd say that the variable's scope is the body of the method, or that the variable is "visible" within that method.) Instance variables (fields) declared at the top of the class, on the other hand, can be accessed by code in any of the methods. Their scope is the entire program.
-
To drive home this concept, please edit the
test1 method in AsmtStmtPractice so that it looks like the code below. (You can copy and paste from this web page to save some typing.)
public void test1()
{
    int silly;      // This declares a new local variable
    silly = -2;     // We then give it an initial value
    x = 100;
    y = 5 + silly;  // Should be able to use silly's value here
}
-
Compile the class (either by clicking the compile button at the top of the code editing window, or by going back out to the main project window and clicking the compile button there), then create a new instance of
AsmtStmtPractice by right-clicking on AsmtStmtPractice and using the drop-down menu as before.
-
Double-click on the object (the red rounded rectangle) and look at object inspector window. Does
silly appear as part of the state of the object? Why, or why not, do you suppose?
-
Call the
test1 method on the object and then check again. Does it show up in the object inspector? Do you see any evidence that silly's value was used within the test1 method?
-
Go back to the
AsmtStmtPractice lab and edit test3 now: Change the x=z; line so it says x=silly; instead, then compile the code. You'll get an error, and if you hover over silly the details emerge. Java doesn't think silly is usable in test2! It was defined inside test1, so its scope is limited to test1 — it's not accessible outside that method.
-
Leave the error in
test3, and let's see what happens if we move silly's declaration outside of test1. Delete the int silly; line from the top of test1 (but only that one line) and edit the fields at the top of the class so that silly is declared there now instead as shown below. (We'll talk in class again about what "private" is doing for us, but it won't affect how the variables and scope work for this example.)
private int x;
private int y;
private int z;
private int silly;    // Add this line
-
Compile the class after adding
silly as a field. Note that it compiles this time! Declaring it at the top of the class makes it visible in all of the methods. Create an instance of the class as before and use the object inspector. Is silly shown? Call test3 and test1 methods and make sure you understand how they interact.
Building a Scene
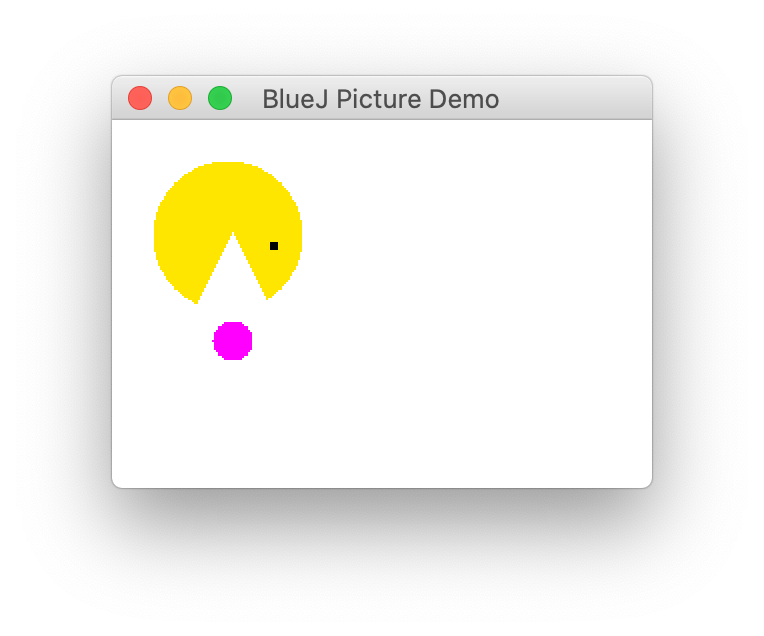
Now it's time to build something! This week you'll create the drawing of a PacMan below, but we'll use the techniques we talked about in class to build a program to generate it so that we can draw it again any time we want.
 In class we learned how to have BlueJ "record" our point-and-click activities as equivalent statements in Java. We discovered that the resulting sequence of statements could be pasted into a constructor, and that the statements would execute and draw the picture. (Later we split the code up, and you'll follow that same sequence in this lab: Start with it all in the constructor, then "fix it".) You can find our code from class here if you need to refresh your memory.
-
Start by opening the
PacMan class and skimming its contents. Note that it contains a constructor (a method with the same name as the class that will run automatically when a PacMan object is created), and two other methods. None of the methods currently contains any code. (There are no Java statements between their open and close curly braces.)
-
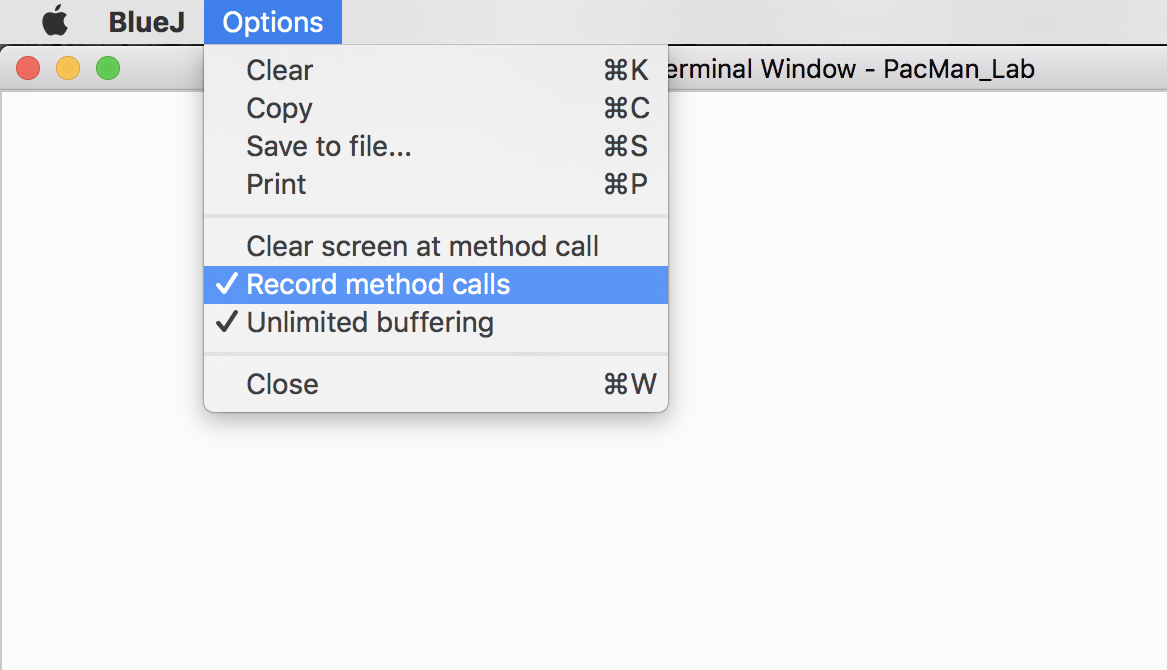
To generate the PacMan "recipe", we'll use the same trick we did in class last week: Select "Show Terminal" from the "View" menu to get the terminal window to appear. On the terminal window's "Options" menu, make sure that "Clear screen at method call" is off, and "Record method calls" is turned on as shown in the diagram below. (If you don't see those options you're probably looking at the wrong "Options" menu — follow the instructions at the start of this step to get to the terminal window first.)
-
Here's the "recipe" for creating the PacMan scene. Use the point-and-click interface to carry out all of the steps, then copy the resulting Java statements from the terminal window and paste them into the constructor in the PacMan class.
  1 Create a new Circle named body
  2 Create a new Circle named eye
  3 Create a new Circle named powerball
  4 Create a new Triangle named mouth
  5 Make body visible
  6 Make eye visible
  7 Make mouth visible
  8 Make powerball visible
  9 Change body color to "yellow"
 10 Change body size to 75
 11 Move body up
 12 Move body up
 13 Change eye color to "black"
 14 Change eye size to 5
 15 Slow-Move eye horizontally by 58
 16 Change mouth size to 75 (height) and 75 (width)
 17 Move mouth horizontally by -150
 18 Move mouth vertically by -85
 19 Change mouth color to "white"
 20 Change powerball color to "magenta"
 21 Change powerball size to 20
 22 Slow-Move powerball horizontally by 30
 23 Move powerball down
 24 Move powerball down
Don't forget to copy the resulting Java statements from the terminal window and paste them into the constructor in the PacMan class before moving on!
-
Whew! That was painful. Let's hope we never have to do all of that pointing and clicking again. Use the Tools/Rebuild Package menu item to throw away all of your hard work and reset BlueJ. This will make it easier to test the PacMan class. Then compile PacMan, and right-click to create an instance of the class. If all went well, PacMan should reappear!
-
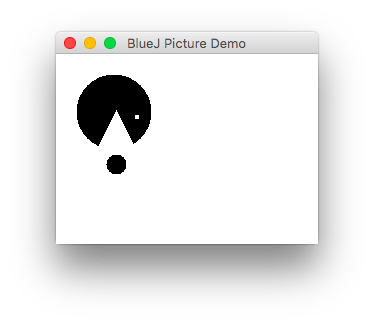
Next let's work on the
makeBlackAndWhite method. The plan is for it to change the color of the objects to black so that the picture looks black and white, but we've got the same problem we ran into in class: The makeBlackAndWhite method can't access eye, or mouth or any of the objects unless they've been stored in fields at the top of the class. Let's fix that..
-
Start by moving the variable declarations to the top of the class, like we did in lecture. (Peek back at the House class for inspiration if need be.)
-
Before you do anything else, verify that the program still works: Compile the class, create a
PacMan instance, and make sure it still looks ok. Then double-click on the object (the red rectangle) to open the object inspector and make sure you can see the fields, and that they're not null.
-
Now add code to
makeBlackAndWhite that changes the color of each of the objects as described in the comments in the body of the method. Try to write the code "by hand" rather than using the point-and-click interface and recording the results. Verify that the method works as expected before moving on.
-
The next step is to finish the definition of the
makeInvisible method. It should call makeInvisible() on each of the objects in the PacMan picture. Verify that it works when you're done.
Extras
If time permits, consider trying some of the following
exercises:
-
Try writing a
makeColor method that could be used to turn a black-and-white PacMan back to its original colors.
-
Write a method that moves the entire picture 50 pixels to the right.
-
Modify the previous method so that instead of always moving 50 pixels to the right, it takes an input from the user specifying how far it should move.
Brad Richards, David Chiu & Joel Ross