CS 161 Lab #1

January 18th

Goals:

For this first lab you'll install the BlueJ interactive Java environment on your personal machines, then download and play with a programming project to get used to the BlueJ tool and the notion of classes and objects. At the end you'll peek at some Java code for the first time. There is nothing to submit for this lab (though I'd like you to show me the results of your Building the House efforts before you leave). The lab participation grade is based on attendance, and making a reasonable effort to complete the activities.

Installing BlueJ and Opening a Project:

  1. The software we're using this semester to write and test our programs, BlueJ, is available free for PC, Mac and Linux machines. You can download the required software from the BlueJ homepage. Please navigate to that site, click on the appropriate link for your operating system, and download BlueJ now. For Mac, the download is a "disk image" file (its name ends in 
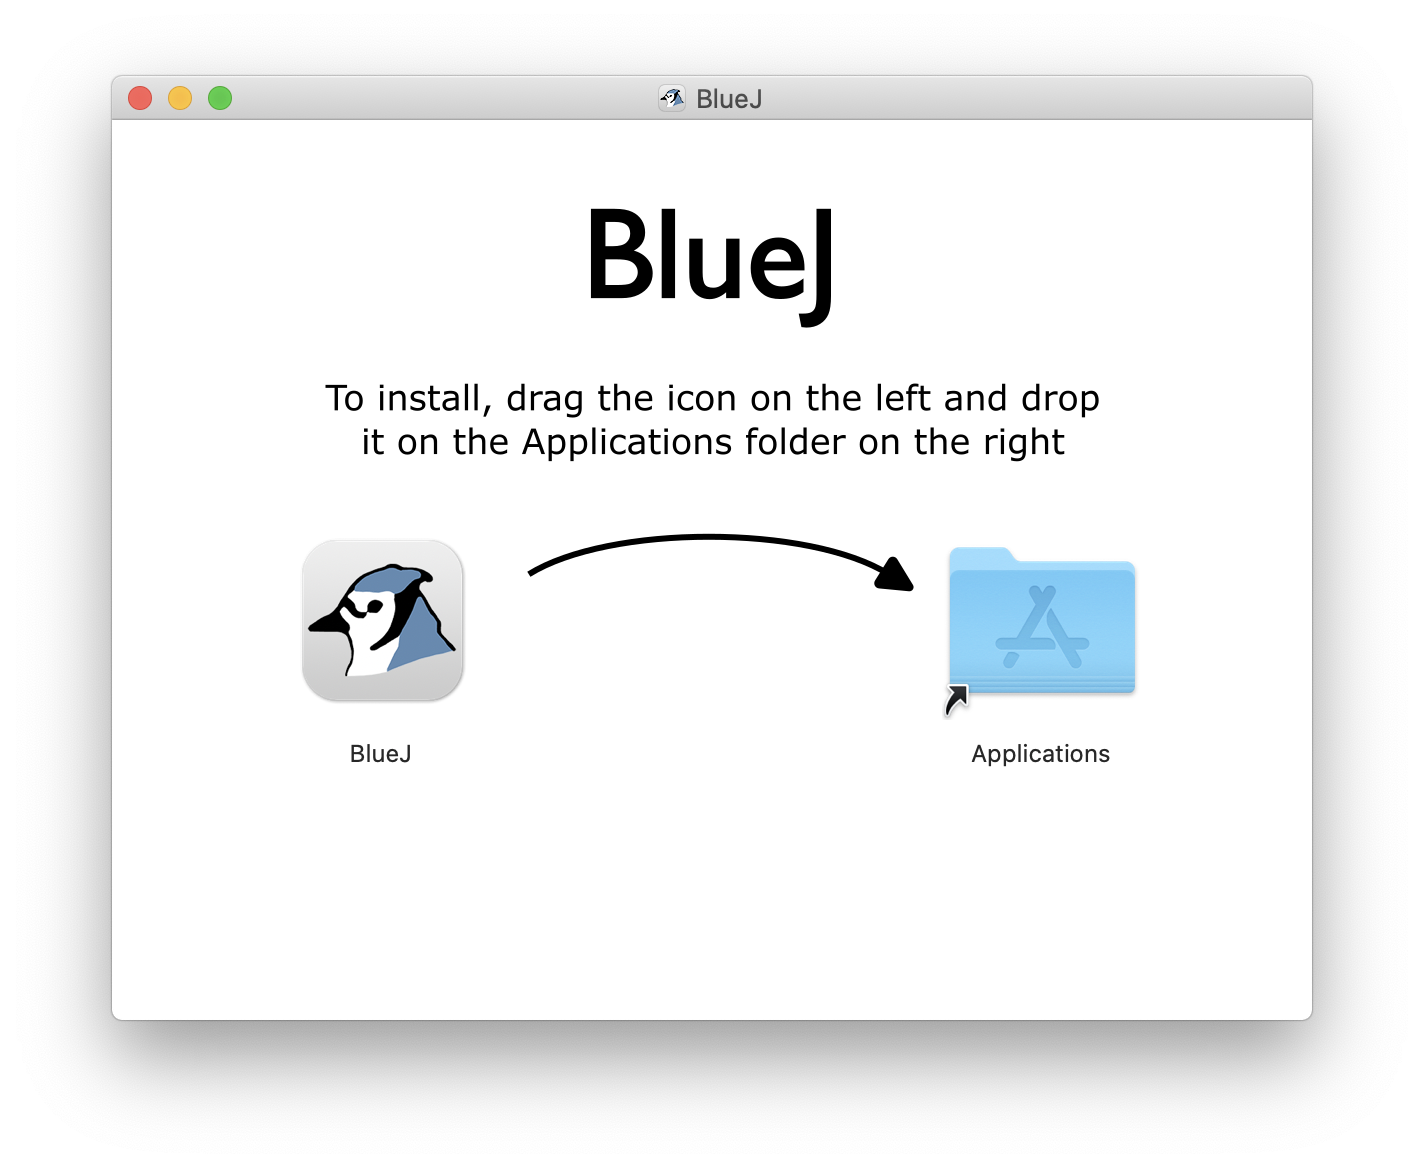
.dmg). Once you find it in your Downloads folder and double-click it, you should see a window like the one below. Click on the BlueJ icon and drag it to the folder. You're done!

    For Windows, the default is that a small installer program downloads, and when you run the installer it will go to the BlueJ site and download what it needs to install BlueJ.
  2. Once you've got BlueJ installed, download the UPS_figures BlueJ project. BlueJ projects are folders containing Java source code (files ending with 
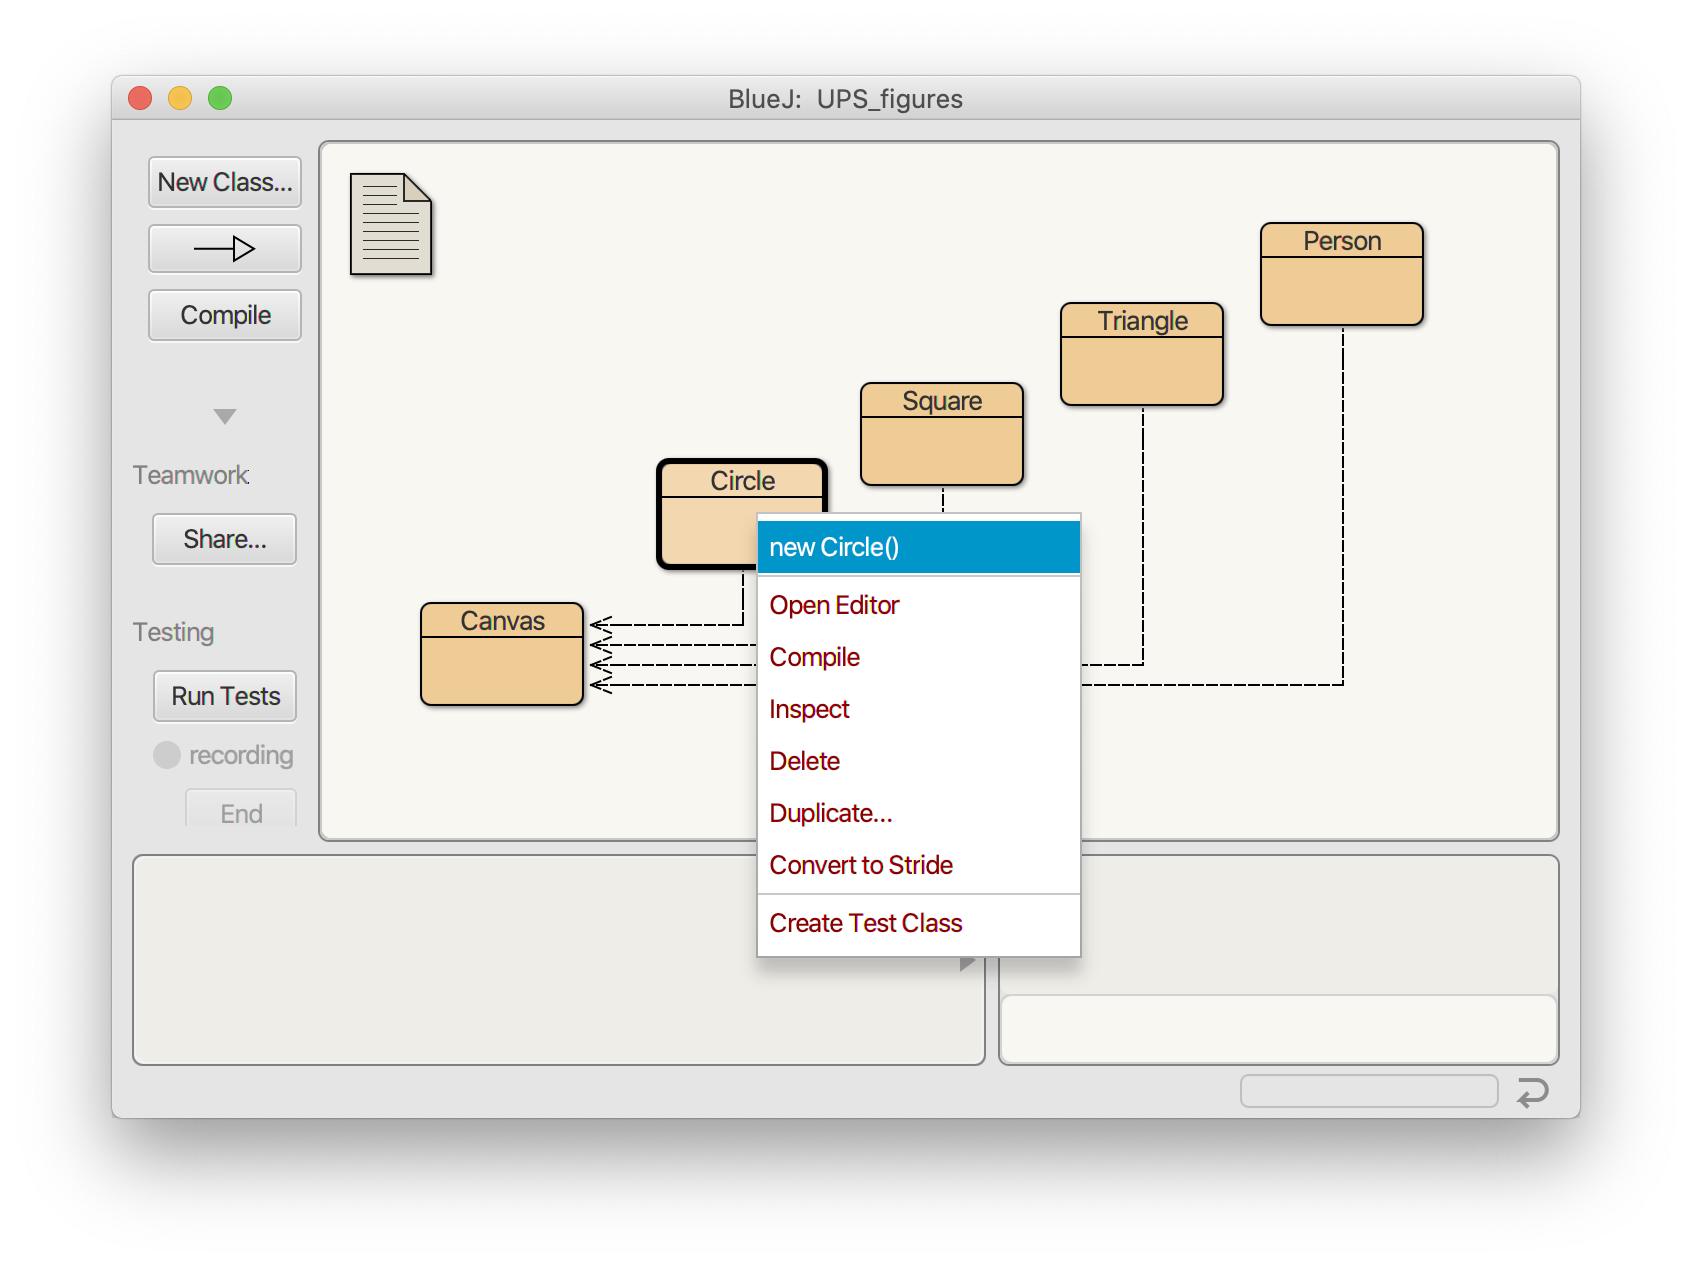
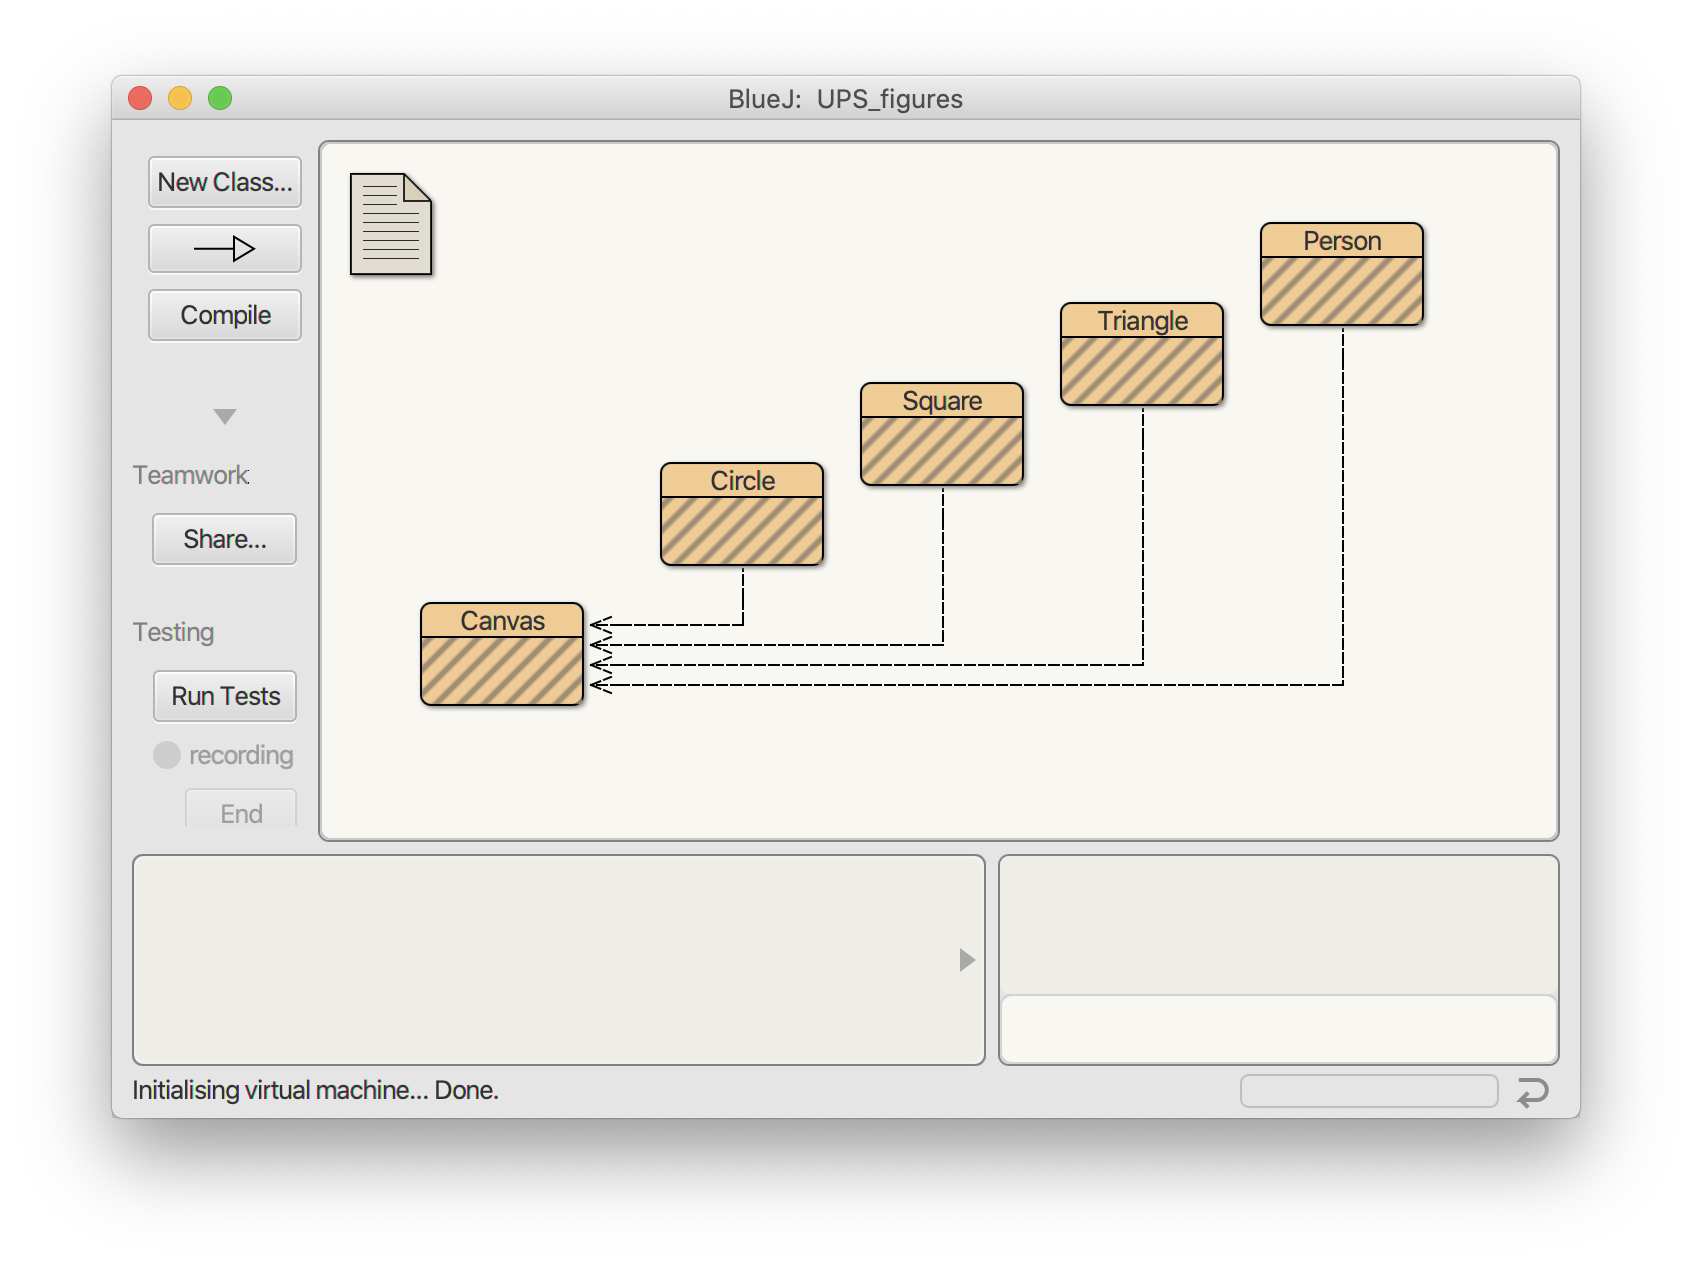
.java), a file called package.bluej that stores information about the project, and some other odds and ends. To make it easier to download, I've zipped up the UPS_figures project folder into a .zip archive. After downloading it, extract its contents, open the folder, and double-click on the package.bluej file to open the project in BlueJ. (Raise a hand if you need some help extracting the files from the .zip archive.) You should end up seeing a window like this:

    Note: If BlueJ starts up but has an empty window when you double-click package.bluej, it's because you didn't really extract the project from the .zip archive. (Windows, in particular, can fool you into thinking it's extracted when it's really not since it lets you "browse" the files in the archive while they're still compressed.) Quit BlueJ, double-check that you extracted the files from the archive, and try again if this happens to you.

    If you get an error message saying "BlueJ could not find any Java systems. A JDK must be installed to run BlueJ", it means BlueJ can't find the Java software it needs. Either you didn't use the installer that had the JDK included, or something went wrong. There's an entry in the BlueJ FAQ that can help you sort things out.

  3. The "stripes" appear on the class icons because the classes haven't been compiled yet. Compiling takes the human-readable Java code in the classes and converts it to a lower-level representation that the processor can actually execute. We can't interact with the classes until they've compiled, so click on the "Compile" button on the left side of the screen to compile before proceeding. If something goes wrong, it's typically because Java isn't properly installed on your machine — see the tips above for resolving Java installation issues and/or raise a virtual hand and ask for help.

Submitting Work Electronically

We'll do some more experimenting later, but first let's practice submitting a project electronically from within BlueJ. You will never submit anything from a lab in the future — this is just practice for when you start submitting programming assignments. I've put the submission instructions on a separate page so they can be referenced more easily in the future. Please visit that page and work through the steps to practice submitting. Let me know if you have any questions or if anything goes wrong. Once you've submitted, continue with the steps below.

Experimenting with BlueJ and Java

Now spend some time playing around with the project to get more familiar with BlueJ and the Java classes in the UPS_figures project. Please try each of the suggested activities below, but feel free to experiment on your own as well. Nothing you can do will hurt the computer or BlueJ. (Worst case, if your experiments break the Java code and it fails to compile, you can always download another copy of the UPS_figures project and start again.)
  1. Recall that the classes (e.g. Circle, Triangle, etc.) are like "blueprints" — they describe the state and behavior of software objects. We can ask a class to create an instance of itself by right-clicking on it. Try this out now: Right click on the Circle class, and select "new Circle()" from the drop-down menu that appears. (See below.) Click "Ok" on the window that pops up proposing the name "circle1" for your new Circle instance, and you should then see a new red rectangle appear representing the new Circle object you created.

  2. Now that you've created a Circle object, let's play around with it: Right click on the object (the red rectangle), and look at the list of behaviors it supports. Experiment with some of them and see what they do. (You'll probably want to start with makeVisible.) Note that some of the behaviors require additional information before they can do their work. For example, changeSize wants to know what the new size should be, so it will prompt you to enter a number before it runs.
  3. Double-click on your Circle object to open the object inspector, and use it to view the object's state (the values it is storing). Spend a moment looking over the state information to see what kinds of info is there. While the object inspector window is still open, try running methods on the Circle object and watch what happens to the state. Try moving the circle off the left edge of the screen so you can't see it anymore. What does the object inspector tell you then?
  4. Right-click on the Circle class again (the brown rectangle) and create a second Circle object. Double-click your new object to open an object inspector on it as well. Note that each Circle stores the same kinds of information, but that the stored values can be different. (For example, the size of one circle might be different from the other, but they've each got a size.) The point of this exercise is to drive home the point that the Circle class is a blueprint describing the state and behavior of a Circle, but we can create as many instances (objects) from the blueprint as we want, and the state in those instances isn't necessarily identical.
  5. Create instances of the Square and Triangle classes, then right-click your new objects to see a list of methods that can be executed on them. Are the methods supported by a Circle the same as for a Triangle? How do they differ?
  6. Open an object inspector for each of the shape objects. Do Triangles store the same set of values as Circles do? Do Squares store the same as the others?

Building my House

In class we went through a series of steps that drew a simple "house". See if you can recreate them in BlueJ as a means of getting some practice creating objects and running their methods. You can use the Tools/Rebuild Package menu item to recompile all of the files and get rid of all of the objects you've created if you want to start fresh, or you can add some additional objects to the ones you created above. Here's what I did:
  1. Make a new Square, called "house"
  2. Make house visible
  3. Make house "blue"
  4. Move house left
  5. Move house left
  6. Move house left
  7. Move house left
  8. Move house left
  9. Make a new Triangle called "roof"
  10. Make roof visible
  11. Move roof up
  12. Move roof up
  13. Move roof up
  14. Move roof up
  15. Move roof right
  16. Move roof horizontally by 10
Once you've created the house, extend it with your own objects. Make a larger house with a window and a door, for example, or add a sun in an appropriate position. If you're up for an additional challenge, see if you can come up with a shorter sequence of steps to draw my house.

A Quick Peek at the Java Source Code

After getting this far, you have a pretty good sense of the state and behaviors supported by the three shape classes. We don't know any Java yet, but there's no harm in taking a peek at the Java code that's inside the shape classes. Double-click the Circle class (the brown rectangle) and take a look around. Can you find the code that seems to be describing a circle's state? What about the behaviors? Once you find the sections where the behaviors are listed, can you tell which of them take extra information (e.g. changeSize) and which don't (e.g. makeVisible)? Feel free to change some of the Java code and see what happens. For example, what if you rename moveRight to be called goRight? (Recompile the code before creating instances of your modified class.)

Extras

If time permits, consider trying one or more of the following exercises:


Brad Richards, 2024